
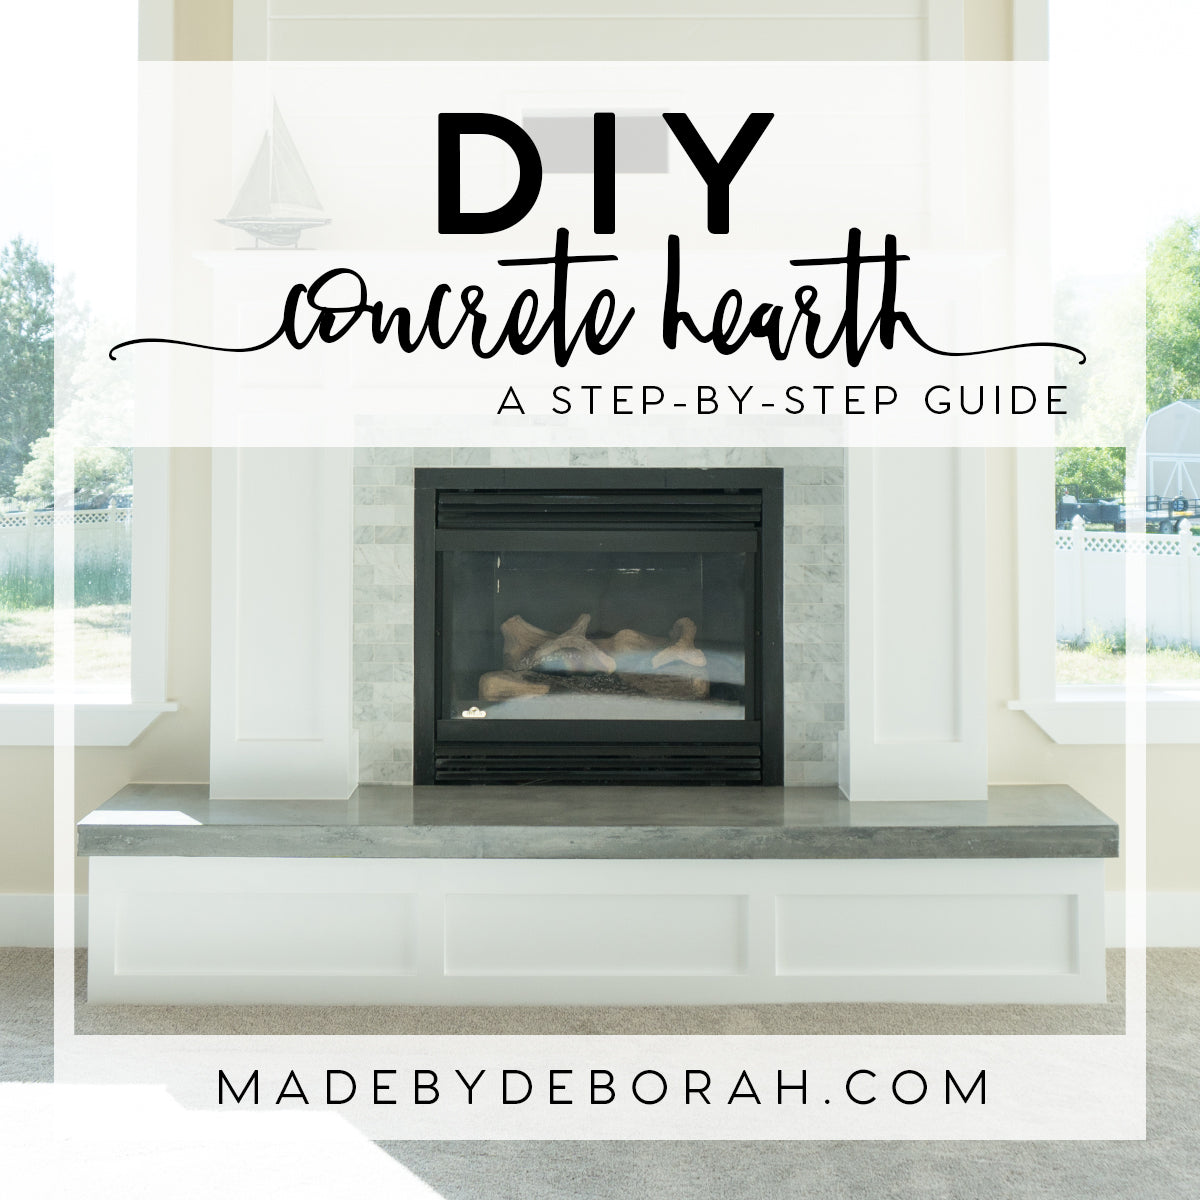
One of my absolute favorite projects to-date has been building my own concrete hearth for our newly remodeled living room. We got plenty of "you're doing what???" looks when we told our friends we would be building a concrete hearth, but now every one of them absolutely loves it. Either that or they now feel obligated to tell us it looks great.
We looked into having a concrete or granite hearth custom made and installed for us but it was going to be over $700. I will say it takes a bit of work and time to build your own so it's up to you to decide how much your time is worth. Said and done, we spent a grand total of $250 on supplies.
CHOOSE THE LOOK
I did hours of research on different colors, finishes, and textures of concrete. I wanted a little bit darker concrete and my husband wanted the natural look so we decided to go natural, assuming the sealer would darken it up a bit. It came out exactly as we hoped and we were both relieved that we could finally agree on something with this project!
TIME:
I spent about 4 days working on it but let it cure for 2 weeks while I waited for supplies to come in.
COST:
$250 for supplies (assuming you have the tools needed)
Supply Cost Breakdown:
$35 - (2) Bags of 50lb. Quickrete Concrete Countertop Mix (I had to special order this from Lowes. It took about 1 week to come in)
$32 - (1) 4'x8' Sheet of Melamine
$22 - Wet/Dry Diamond Sanding Pads (grits: 200, 400, 800, 1500)
$6 - Caulk
$6 - Vaseline
$11 - Latex or Nitrile Gloves
$10 - Buddy Rhodes Bone Paste
$10 - Buddy Rhodes Pigment
$30 - Cheng Concrete Sealer
$34 - (2) Dollies
$6 - (2) 5-Gallon Buckets
$13 - Concrete Mixing Paddle
$22 - Concrete Float
$13 - Finishing Trowel
$5 - 1/2 inch Rebar
$7 - Steel Remesh Sheet
$3 - Rebar Ties
TOOLS:
(2) Clamps
Wet/Dry Random Orbital Sander
Brad Nailer/Air Compressor or Drill/Wood Screws
Table Saw or Circular Saw
Hammer Drill
OUTLINE YOUR PLAN
I'm a very visual person, so drawing out my plans on a sheet of paper really helped me envision what needed to happen. Start writing down measurements and be sure to factor in the 3/4 inch thickness of the melamine.
GET YOUR SUPPLIES
We picked up supplies from all over the place - Lowes, Home Depot, Buddy Rhodes, Amazon, and Ebay.

PREP YOUR WORKSPACE
Luckily, we had already demoed our living room, so we were able to set up shop right smack in the middle of the floor. This meant we didn't have to try and move this gigantic slab of concrete through the house when it was done. We laid down a thick sheet of plastic on the floor and set out two dollies to lay the melamine on top of.
MAKE THE MOLD

This step took up the biggest chunk of time. I always measure twice and cut once, but for this mold, I felt like I was measuring 10 times and cutting once.
If at all possible, DO NOT HAVE A LIP ON YOUR HEARTH! We only had an inch to work with between our framing and the bottom of our fireplace, but we wanted a 3-inch hearth bench. This left us with two options: (1) only make it 1-inch thick OR (2) make it 1-inch thick but do a 3-inch lip on it. We went with option #2 but it made the mold assembly extremely confusing. We also had to work around the existing columns, which added to the confusion when measuring. Had we been pouring just a simple 3-inch rectangular slab, we would have saved so much time.
I couldn't quite envision everything from beginning to end, so I took a couple of important measurements and just started cutting. I started with the bottom piece and worked my way up from bigger pieces to smaller pieces.

A table saw would work great for cutting the melamine, but I prefer using a circular saw. I have more control with it, which means I get straighter cuts. Either way, you'll make a huge mess so cut it outside if you can.
I used a spare piece of hemlock as my guide. Any piece of wood will work, as long as it's straight on at least one edge. Measure on both ends of the melamine, line up your guide and clamp down both ends nice and tight. Make sure you factor in the distance between the blade and the blade's guide, which is typically 1.5".
I found it helpful to write out the dimensions on each of the pieces I cut so I could keep track of what else still needed to be done. Just be sure to write on the outside of the melamine. Any writing that is touching the poured concrete will create an indentation that will need to be filled.
ASSEMBLE THE MOLD
Using your brad nailer, simply line up each of the pieces and staple away. The only tricky part here is making sure you do not let the nail come through the inside of your mold. Once the concrete sets, it will show every little imperfection, especially any nail holes you have tried to patch up. If you don't have a brad nailer, a drill and wood screws will work just as well. Make sure you drill a pilot hole before putting your screws in, otherwise the melamine will split. Set your mold on top of the dollies, with the dollies evenly spaced between the edges and each other. If they are too close the middle of the mold might bow upwards, and if they're too far apart the middle might bow downwards. You want a perfectly level and flat mold.
CAULK THE MOLD
Putting vaseline close to (but not in) the corners will make cleanup of the excess caulk easier, but if you're confident in your caulking skills feel free to skip that step. Cut the tip of the caulk to the smallest notch and get to caulking! You'll want to have your latex or nitrile gloves on for this step. Put a very thin bead of caulk along all inside seams and run your finger or a caulk tool along the bead.
CLEAN THE MOLD
Once the caulk has dried completely (after a few hours if you're brave or overnight to play it safe), wipe down the entire inside of the mold with rubbing alcohol. Make sure it is completely clean and dust-free.
POUR THE CONCRETE
This step is where having a second person really comes in handy. One person mixes, while the other person fills the mold. Mixing the concrete is much easier in small batches and once you've started, you'll need to work quickly.
Pour a small amount of concrete into one of your buckets. Add water and mix. Continue adding water and concrete until your bucket is about 1/2-2/3 full and has a thick peanut butter consistency. There's a fine line between too much, too little, and the perfect amount of water. The more water you have, the weaker your concrete will be. If you don't have enough water, you will have more air pockets that don't settle and your concrete may not cure properly. My husband wanted more water to make it easier to pour and I wanted less water to make it stronger (very paranoid about it breaking during installation). We ended up settling somewhere in the middle.
My husband mixed the concrete using the hammer drill and mixing paddle, helped me pour the first little bit, then began working on the next bucket of concrete while I finished pouring the first bucket and spreading it. Make sure you have your hammer drill on the correct setting. We had a moment of panic when halfway through pouring and mixing, our drill starting spewing sparks and smoke. The crisis was averted though and we quickly got back to work. When the mold was halfway full, I added some pre-cut wire mesh to the entire surface and then continued to fill the mold. I used the finishing trowel to spread and flatten the concrete and then went over it with the float. The trowel should be held at about a 45-degree angle but the float should be held flat against the concrete and slowly moved across the top.
Once we had the concrete 1-inch thick, we attached the piece that would allow us to create a lip. I had previously attached pieces to the top that would allow me to quickly place it on top of the existing edge without having to take time leveling it. I added rebar to the lip area and finished filling up the mold.

REMOVE AIR BUBBLES
Don't skip this step! Once the concrete was poured, we used the random orbital sander and a hammer/piece of wood to try and shake any air bubbles out of the concrete. After this step, we had to add a little more concrete to some areas and then trowel and float it again.
SPRAY & COVER
Once you're happy with how it looks, spray a little water over the top and cover it. I have read that people use a felt-back tablecloth. We actually forgot to get one, so we didn't cover it but we had it inside a temperature-controlled room where nothing would touch it.
LET IT CURE
Check the instructions on your bag of concrete. The longer you let it cure, the stronger it will be. I had read tutorials that just let it cure overnight, but I didn't want to risk it. Our piece was 89 inches across and only 1-inch thick in most places so I let it cure as long as I could handle not touching it. We had to wait for some supplies to come in, so it ended up sitting for 2 weeks before we dared to touch it.
REMOVE THE MOLD
This felt like Christmas! I'm not going to lie... I did pull off a couple of pieces before my husband came to help. I just couldn't stop myself. We took the outer edges of the mold off first before turning it up on the lip and placing it onto the hearth frame to be sure it fit. It didn't quite fit so we had to take a belt sander to the columns to get it to squeeze on.
SAND THE CONCRETE
This was a confusing step for me! We initially bought a grinder and some pads that were supposed to be for masonry. Biggest waste of money. Just get the correct sanding pads the first time. I found these sanding pads on Ebay that worked great and were really inexpensive. They need to be diamond wet/dry pads or else they will wither away within 30 seconds of touching the concrete with them.
I used a random orbital sander that was probably not meant to be wet... it makes strange noises now and struggles to sand wood. I have since found a great wet/dry sander. These sanding pads will velcro right onto the sander.
Prep your concrete by pouring water across it. Start off with your 200 grit pad. Pour water, keep your sander moving over it constantly, move to the next area and repeat. Continue moving up in grit until your concrete is as smooth as you'd like it to be. Don't worry much about the underside but you will definitely want to sand the underside of the lip so that it's smooth if anyone touches it while they're sitting.
FILLING HOLES
The sanding exposed a ton of little pinholes and there were plenty of spots where concrete had not settled into air pockets. I like a clean, sleek look so I wanted all of these pockets filled. The concrete also will not seal properly if there are holes. Here's where the Buddy Rhodes Bone Paste Plus became one of my favorite products. I mixed some bone paste with a tiny bit of Buddy Rhodes Ash Ultra-fine Pigment, then added water until it was a slightly runny peanut butter consistency. With gloves on, I spread the bone paste over all the pinholes. For deeper voids, you have to do it in thin layers otherwise, it will crack when it dries. After filling all the holes, I took a damp, clean rag and wiped off the excess bone paste.
After 24 hours, sand again. I had to repeat this process 3 times before I had it looking perfect. If you're not a perfectionist, you could probably get away with doing it once or twice.
SEAL THE CONCRETE
Once the concrete and bone paste are fully cured, it is time to seal this baby! I used Cheng's Concrete Sealer and it worked great.
I followed the online instructions for applying the sealer, not the instructions on the bottle. Start off with a small amount because you will quickly use up most of the bottle. Also make sure to wear nitrile gloves, a mask, and goggles.
I read a few different tutorials online that said to do up to 10 layers. 6 layers ended up being the magic number. On the 7th layer, my perfect, streak-free surface suddenly had streaks and air bubbles. They're not too noticeable so I left it that way and figure it will wear down over time.
I waited 48 hours before doing a water test and it passed with flying colors! The final step was placing it on the hearth frame and sitting back to admire it.


